IDE Setup
There are multiple IDEs that have been used in the past to develop the GUI.
While editing the code itself can be done with any IDE, running the application comes with some pitfalls,
due to the usage of Common Build Next Generation (CBNG) to resolve dependencies.
CBNG is only available in the Technical Network and one needs to either run the development tools from somewhere in the TN (e.g. from the dev-server) or mount the required paths via sshfs.
In principle running the CBNG commands can be done through the command-line, but to have full debugging capabilities it is recommended to set it up in the IDE directly.
The easiest IDE to setup is the modified Accsoft Eclipse versions, as for IntelliJ IDEA and VSCode additional configuration is required. We recommend nonetheless the usage of VSCode, as this is the one most widely used in our team and hence we have the most experience with it. To be able to use the same IDE for different languages is also of value.
Setting Up the IDE
VSCode
To be able to use VSCode as an IDE for Java, the Extension pack for Java needs to be installed.
Additionally, the following settings need to be set in Extensions -> Language Support for Java -> Gradle:
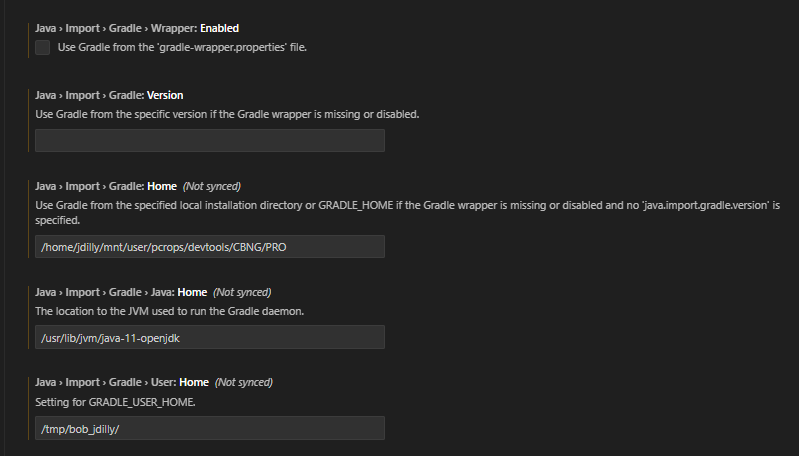
- Java > Import > Gradle > Wrapper: Enabled:
Needs to be un-ticked. - Java > Import > Gradle: Version:
Needs to be empty. - Java > Import > Gradle: Home:
Set to the absolute path to the CBNG directory, e.g./user/pcrops/devtools/CBNG/PRO/or wherever you have mounted the/userfolder (see screenshot). - Java > Import > Gradle > Java: Home:
Set to where the Java SDK is installed, e.g./usr/lib/jvm/java-11-openjdk/on your current system. This is very important as otherwise the wrong Java version might be used! - Java > Import > Gradle > User: Home:
Set a path to where you want your local gradle wrapper to put the cached data, e.g./tmp/bob_username/. Beware that this setting might also be steered via theGRADLE_USER_HOMEenvironment variable. Make sure that you do not have conflicting values there, as it is not clear which one will have priority.
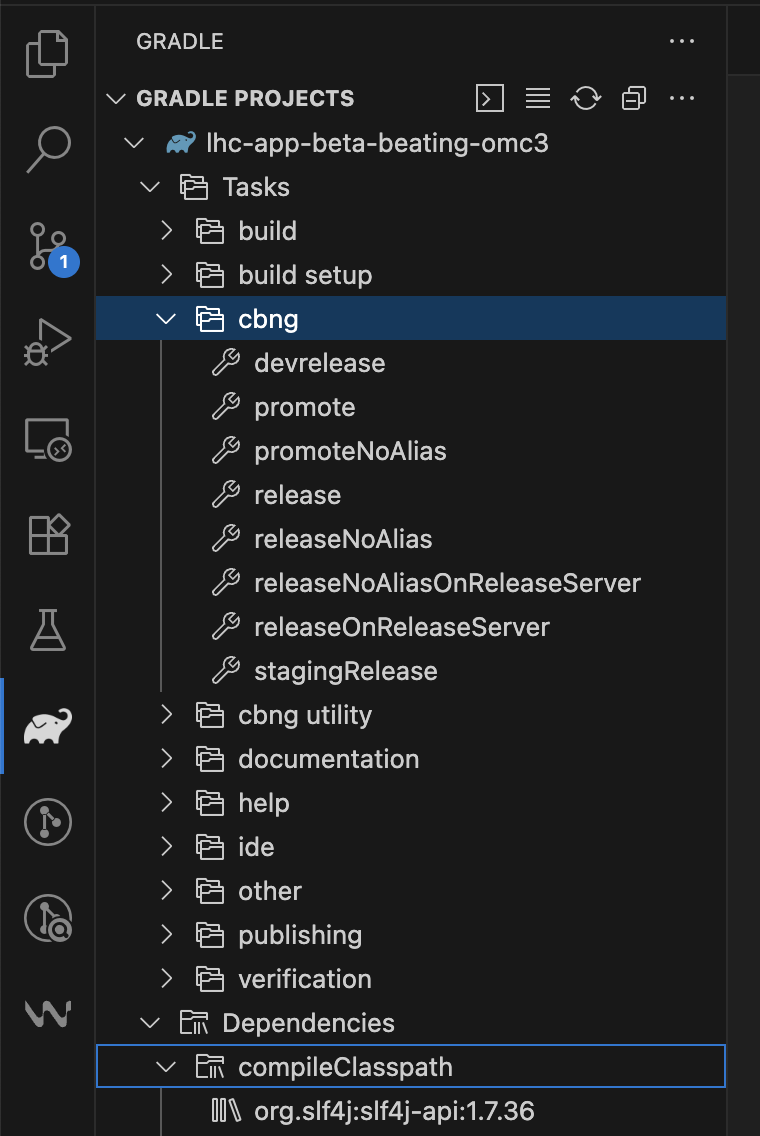
If everything worked correctly, the CBNG specific tasks and dependencies should be available from within the IDE in the Gradle (Elephant) view in the sidebar.
Launch Configuration
To create a launch configuration for the main class, add the following to the launch.json file:
  {
      "type": "java",
      "name": "Main",
      "request": "launch",
      "mainClass": "cern.lhc.betabeating.main.Main",
      "projectName": "betabeating-app"
  }
Troubleshooting
If you are having problems with the setup, check the CBNG Wiki for further details.
Often it is enough to remove the cached dirs, typically /tmp/bob_username (see GRADLE_USER_HOME above) and /tmp/bob_cache_username (check BOB_USER_CACHE) and then restart VSCode (Ctrl + Shift + P -> Reload Window).
Eclipse
A more extensive guide can be found in the CBNG Wiki for Eclipse integration.
In short, download your preferred version from their download page and install.
With this version, CBNG comes automatically installed and can be used by simply dragging the desired project into the CBNG window.
IntelliJ IDEA
A more extensive guide can be found in the CBNG Wiki for IDEA integration.
In short, download your preferred version from their download page and install.
CBNG needs to be setup in IDEA manually, by setting the Gradle home path in:
File -> Settings -> Build, Execution, Deployment -> Build Tools -> Gradle
to the specified location /user/pcrops/devtools/CBNG/PRO/ or wherever you have mounted the /user folder
IntelliJ Specificity
After importing a project (see below), you might have to:
- Create an empty
build.gradlefile if you want to trigger a gradle import dialogue where you need to choose use local gradle distribution and set the gradle home to/user/pcrops/devtools/CBNG/PRO/bin/bob(as above). - Go to
File -> Project Structure ... -> Modulesand set the Dependencies storage format toEclipse (.classpath). This one you should check on a regular basis, as it tends to reset itself.
CBNG from the Command Line
Another sometimes easier alternative that works with any IDE is to run CBNGs bob with the desired command (e.g. build, dependencies, eclipse) in the folder of the project from the commandline.
The full path to bob is:
/user/pcrops/devtools/CBNG/PRO/bin/bob
Info
See bob --help for instructions about its commands.
Environment Variables
CBNG needs to be run with the same environment variables as the IDE, e.g. JAVA_HOME, BOB_USER_CACHE and GRADLE_USER_HOME (see VSCode).
You can for example export them in your ~/.bashrc file, or in the terminal where you run CBNGs bob commands.
export BOB_USER_CACHE=/tmp/bob_cache_username
export GRADLE_USER_HOME=/tmp/bob_username
export JAVA_HOME=/usr/lib/jvm/java-11-openjdk/
Importing a Project
The project can be imported using the git-integrations of the IDEs (Eclipse and IntelliJ) directly, using the Gitlab paths below. This should be straightforward, but you are giving up some control.
It is recommended to import a project manually, following the steps below: Firstly, you should clone the desired repository to an adequate location on your hard-drive, depending on which project you want to work on:
git clone https://gitlab.cern.ch/acc-co/lhc/lhc-app-beta-beating
You then simply import/open the project into your IDE.
To make it runnable, you will have to use CBNG to resolve dependencies and build the project first.
Depending on your IDE, this might be run automatically (VSCode) or you should run CBNGs eclipse or idea (in case of these IDEs) followed by build (all IDEs).
Running clean and/ordependencies can also help.
Warning
No one in the OMC-Team is a CBNG expert, and sometimes running these commands leads to the desired outcome (of a runnable project) or not depending on the colour of the DG's clothing.